Looking to build a decentralized application (dApp) on the U2U network? This Step by Step Guide to Creating DApp on U2U Network walks you through the entire process, from setting up your development environment to deploying your smart contract and building the frontend.
Step by Step Guide to creating DApp on U2U network
1. Understand the U2U Ecosystem
Before diving into the technical aspects, it’s important to familiarize yourself with the U2U ecosystem. The U2U Network consists of the Unicorn Ultra Chain (Layer-1) and the Unicorn Ultra Subnet (Layer-2). Understanding this structure will help you optimize your dApp for scalability, performance, and flexibility.
- Layer-1 (Unicorn Ultra Chain) serves as the base layer, ensuring security and decentralized operations.
- Layer-2 (Unicorn Ultra Subnet) enhances scalability, enabling faster and cheaper transactions.
By leveraging the benefits of both layers, your dApp can offer seamless, cost-efficient experiences for users.
2. Set Up Your Development Environment
To build a dApp on the U2U network, you’ll need to set up a proper development environment. The essential tools include:
- Node.js: This JavaScript runtime is necessary for running code and handling backend interactions.
- Truffle or Hardhat: These frameworks allow you to develop, test, and deploy smart contracts on the U2U Network. They come with powerful testing tools to ensure smooth deployment.
- U2U SDK: The U2U Software Development Kit (SDK) is a must-have for interacting with the network efficiently.
These tools are fundamental for creating your dApp, enabling you to integrate the blockchain functionality seamlessly.
3. Create Your Smart Contract
Writing a smart contract is at the heart of any decentralized application. You can write your contract using Solidity (or other compatible languages), ensuring it follows U2U’s standards.
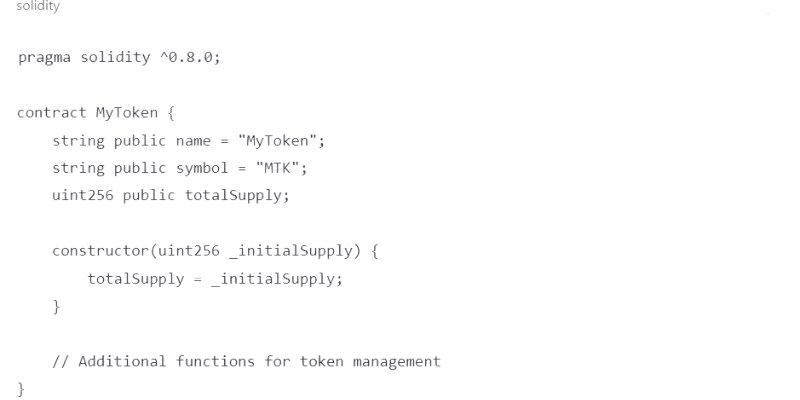
For example, if you want to create a simple token, the structure of your smart contract might look like this:

This contract defines a token called MyToken with basic features, including a name, symbol, and a constructor for initializing the supply.
4. Deploy Your Smart Contract
Deploying your smart contract is an essential step in building your dApp on the U2U Network. Using Truffle or Hardhat, you can deploy your contract to the U2U testnet for initial testing or directly to the mainnet for a live application.
Here’s a basic deployment process:
- Set up the deployment script.
- Use U2U tokens to pay for transaction fees during deployment.
- Test your contract on the testnet to ensure its functionality before going live.
This step ensures that your contract interacts correctly with the U2U network and provides a solid foundation for your dApp.
5. Build the Frontend of Your dApp
Now that your smart contract is ready, the next step is to develop the frontend. A user-friendly interface is crucial for a positive user experience.
- Use frameworks like React or Vue.js to create dynamic, responsive interfaces.
- Integrate blockchain interactions using libraries such as Web3.js or Ethers.js, allowing users to interact with your smart contract directly from the frontend.
The frontend should allow users to perform actions like token transfers, data queries, and other dApp functionalities seamlessly.
6. Integrate Wallet Support
To make your dApp fully functional, it’s essential to integrate wallet support. Wallets like MetaMask allow users to manage their assets and interact securely with the blockchain.
By adding wallet integration, you enable users to send transactions, sign contracts, and interact with your dApp in a decentralized and secure manner.
7. Test Your dApp
Before launching your dApp on the U2U mainnet, conduct thorough testing on the U2U testnet. This ensures that your dApp functions smoothly and without bugs.
Tools like Ganache can help you perform local testing and debugging, ensuring that all aspects of your dApp work perfectly in different scenarios. Testing is crucial for identifying any vulnerabilities or errors in your smart contract or frontend.
8. Launch Your dApp
Once testing is complete and your dApp is fully functional, it’s time to deploy it on the U2U mainnet. After deployment, promote your dApp to attract users to the U2U Network.
The mainnet launch is an exciting milestone, as your decentralized application will now be accessible to a global audience, with real transactions and real users.
9. Monitor and Update
The development of a dApp doesn’t stop at the launch. Post-launch monitoring is essential for ensuring your dApp remains efficient and bug-free.
- Monitor performance, transaction costs, and user activity.
- Gather user feedback to identify any areas for improvement.
- Update your dApp regularly to fix bugs and introduce new features based on user input.

Building a dApp on the U2U Network
Creating a dApp on the U2U Network involves several steps, from understanding the architecture to deploying your application and integrating wallet support. With its powerful combination of Layer-1 and Layer-2 technologies, U2U offers a scalable and secure platform for building decentralized applications.
By following this Step-by-Step Guide to Creating a DApp on U2U Network, you’ll be well on your way to developing a high-performance decentralized application that can thrive in the U2U ecosystem.

